 Placing a new hingePlacing a new hinge
|
Tool |
Tool set |
|
Insert Truss
|
Rigging |
You can insert a hinge individually, to define the angle for future truss connections, but hinges are frequently placed on existing truss lines; see Adding hinges to an existing system.
Only one hinge can be inserted at a time; Distributed Insertion mode does not apply to hinge trusses.
To insert a hinge:
1. Click the tool, and then click Truss symbol on the Tool bar. From the Resource Selector, double-click a hinge resource to activate it. If a symbol is not selected, the Select Symbol dialog box opens automatically to select one.
Alternatively, from the Resource Manager, either double-click the hinge symbol or right-click on the hinge symbol and select Make Active from the context menu. The Insert Truss tool is automatically selected.
If a hinge symbol is accidentally inserted by the Symbol Insertion tool, the truss functionality will not be present. When correctly inserted, the Object Info palette displays “Truss” for the selected hinge.
If the selected hinge has insufficient data for proper calculations, the Truss Properties dialog box opens for Setting custom truss parameters.
2. Click the placement mode, to set the hanging angle. If Custom Placement is selected, specify the Hanging Angle.
3. Do one of the following:
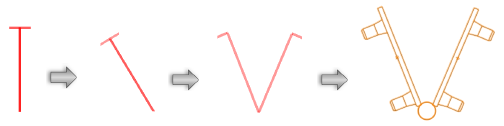
● To insert a book hinge: In Top/Plan view, click to insert the hinge. Move the mouse to rotate the first part of the hinge, and click to place it. Then move the mouse to set the hinge angle, and click to place the second part of the hinge.
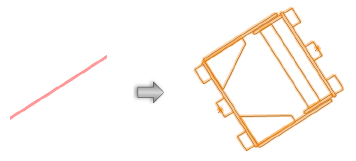
● To insert a center hinge as a straight piece of truss: In Top/Plan view, click to insert the hinge. Then click to set the hinge rotation and place the hinge; the hinge angle is 0 (zero) degrees.
● To insert a center hinge with a custom angle: In a 3D view, click to insert the hinge. For best results, set a view that is perpendicular to the hinge direction. Move the mouse to rotate the first part of the hinge, and click to place it. Then move the mouse to set the hinge angle, and click to place the second part of the hinge.

The hinge angle must be between the Minimum and Maximum Angle specified in the Truss Properties dialog box; if not, the closest valid angle will be used.
To change the hinge angle, edit the Hinge Angle on the Object Info palette, or move the control points on the hinge truss itself.
The Truss properties can be edited from the Object Info palette.
~~~~~~~~~~~~~~~~~~~~~~~~~
