 Adding hinges to an existing systemAdding hinges to an existing system
|
Mode |
Tool |
Tool set |
|
Auto Connect
|
Insert Truss
|
Rigging |
Hinge trusses can be added to an existing truss system to create custom angled connections. The hinge is automatically inserted at the same hanging angle as the existing system, even if a different placement mode or hanging angle is specified. Center hinges can also be used as straight trusses, to help distribute stress on a beam. Because hinges have movable parts, the workflows for inserting and connecting them are different from other truss structures.
Only one hinge can be inserted at a time; Distributed Insertion mode does not apply to hinge trusses.
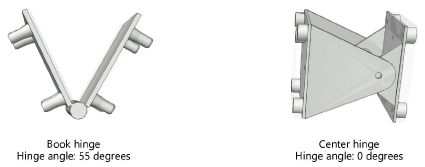
Hinge trusses are treated as joints in Braceworks calculations. Book hinges are assumed to be non-load-bearing structures, and center hinges are assumed to be load-bearing.
|
|
Click here for a video tip about this topic (internet access required). |
To add a hinge to an existing system:
1. Click the tool, and then click Truss symbol on the Tool bar. From the Resource Selector, double-click a hinge resource to activate it. If a symbol is not selected, the Select Symbol dialog box opens automatically to select one.
Alternatively, from the Resource Manager, either double-click the hinge symbol or right-click on the hinge symbol and select Make Active from the context menu. The Insert Truss tool is automatically selected.
If a hinge symbol is accidentally inserted by the Symbol Insertion tool, the truss functionality will not be present. When correctly inserted, the Object Info palette displays “Truss” for the selected hinge.
If the selected hinge has insufficient data for proper calculations, the Truss Properties dialog box opens for Setting custom truss parameters.
2. Enable Auto Connect mode; see Concept: Creating a connected rigging system for more information.
3. Move the mouse to hover over an existing truss; valid connections are highlighted.
Depending on the type of hinge and the view, various insertion options are previewed. Connecting a book hinge will show different options from connecting a center hinge, and Top/Plan view will provide different options from 3D insertion.
If no highlighting occurs with Auto Connect enabled, there may be a connection already in place, or the trusses may not be compatible connectors.
4. When the desired location is highlighted, do one of the following:
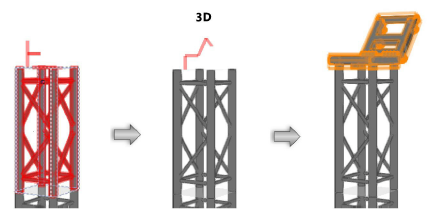
● To insert a book hinge: In Top/Plan or 3D views, click to insert the first part of the hinge. Move the mouse to set the hinge angle, and click to insert the second part of the hinge.
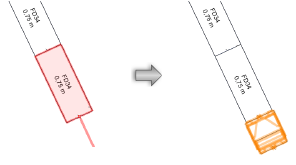
● To insert a center hinge as a straight piece of truss: In Top/Plan view, click to insert the hinge; it is automatically aligned with the existing truss and the hinge angle is 0 (zero) degrees.
● To insert a center hinge with a custom angle: In a 3D view, click to insert the first part of the hinge. Move the mouse to set the hinge angle, and click to insert the second part of the hinge.
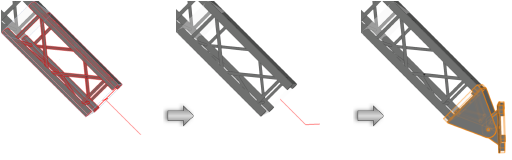
The hinge truss is connected to the system.
The hinge angle must be between the Minimum and Maximum Angle specified in the Truss Properties dialog box; if not, the closest valid angle will be used.
To change the hinge angle, edit the Hinge Angle on the Object Info palette, or move the control points on the hinge truss itself.
The Truss properties can be edited from the Object Info palette.
~~~~~~~~~~~~~~~~~~~~~~~~~


