|
Command |
Path |
Shortcut |
|
Attributes |
Window > Palettes |
● Ctrl+Shift+A (Windows) ● Cmd+Shift+A (Mac) |
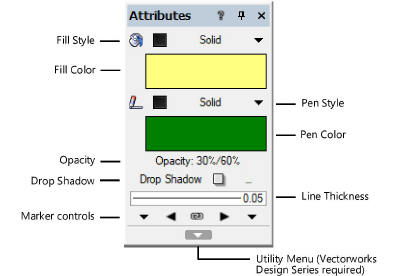
The Attributes palette applies attributes to objects, and displays the attributes currently applied to a selected object. Select the command to open the Attributes palette.

Attributes can be applied to most 2D planar and screen objects, with a few exceptions. Line end markers can only be applied to open objects, such as lines, arcs, and polylines. Only pen color, opacity, and drop shadow can be applied to text; however, a fill can be applied to the text box (the background behind the text).
If you are using the same attribute settings for several objects, create a class for those objects and apply the class attributes at creation. Class attributes can also be set for selected objects and specific attributes; see Setting class attributes.
Most of the attribute types (fill, pen, opacity, drop shadow, line thickness, and marker) are specified directly from the Attributes palette. Settings available on the palette can also be customized.
Line types, and hatch, tile, gradient, and image fills are resources. You can apply existing resources from the Attributes palette, and then map (adjust) the resource to suit a specific object, if needed. To create or edit resources, use the Resource Manager.
|
|
Click here for a video tip about this topic (internet access required). |
The settings that display on the Attributes palette when no objects are selected are automatically applied to each new object when it is created, unless a class attribute is assigned.
When you first open a new file, set the attributes to those you use most often. For example, you might adjust the fill and line colors, and line thickness.
The attributes apply to the current file only. Custom patterns that you create cannot be used in other files. To save a set of default attributes or custom patterns for future use, set the attributes and save the file as a template.
To set the default attributes for a file:
1. Ensure that no objects are selected.
2. From the Attributes palette, select the desired attributes. Objects created after this point use these attributes by default.
The defaults can also be set with the Eyedropper tool (see Transferring attributes).
To apply attributes to existing objects:
1. Select one or more objects.
2. From the Attributes palette, set the desired attributes for the object.
 Attribute sets
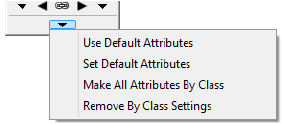
The Attributes palette includes a utility menu for making changes to all the attributes at one time. A set of default attributes can be saved and then restored, and attributes can quickly be set to be “by class,” or have all “by class” settings removed.
To access the Attributes palette utility menu:
1. From the Attributes palette, click the Utility Menu button to open the menu.

|
Command |
Description |
|
Use Default Attributes |
Restores the default Attributes palette settings to the set that was specified with Set Default Attributes |
|
Set Default Attributes |
Saves all current parameter settings in the Attributes palette as the default set |
|
Make All Attributes By Class |
Sets all Attributes palette parameters to be determined by the object’s class (see Setting class attributes) |
|
Remove By Class Settings |
Removes any “by class” settings for all Attributes palette parameters |
2. Select a utility command to set or restore the default attributes or change the Attribute palette by class settings.
~~~~~~~~~~~~~~~~~~~~~~~~~