 Creating roof facesCreating roof faces
Command |
Workspace: Path |
Roof Face |
● Architect: AEC ● Landmark: Landmark > Architectural ● Spotlight: Spotlight > Architectural |
To create a roof face:
1. Draw the 2D object that is the basis for the roof. Any enclosed 2D object can be used, such as enclosed arcs, polylines, rectangles, circles, and ovals.
2. With the object selected, select the command.
The Create Roof Face dialog box opens. Specify the roof slope creation method, edge and hole miter options, and roof parameters.
![]() Click
to show/hide the parameters.
Click
to show/hide the parameters.
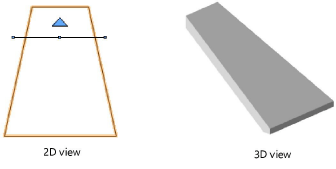
3. Click-drag the cursor across the 2D object to draw a line that defines the roof axis; click again to complete the line. An arrow displays on one side of the line, indicating which side of the object will be the high side of the roof.
4. Point the cursor to the side of the roof that will be highest, and then click again. The roof axis line displays selection handles, and the arrow pointing to the high side of the roof turns blue, indicating that the roof face is complete.
~~~~~~~~~~~~~~~~~~~~~~~~~