Inserting Windows in Vectorworks
Design SeriesInserting Windows in Vectorworks
Design Series
Inserting Windows in Vectorworks
Design SeriesInserting Windows in Vectorworks
Design Series
To insert a window:
1. Select the Window tool from the Building Shell tool set.
Alternatively, if placing a curtain wall window into a curtain wall (Vectorworks Architect or Landmark required), select a panel with the Edit Curtain Wall tool, and then right-click (Windows) or Ctrl-click (Mac) on the panel and select Insert Window from the context menu. The window is automatically inserted as a curtain wall window.
2. If this is the first time a window is inserted into the drawing, or if you wish to change the default preferences that apply to subsequently placed windows, click Preferences from the Tool bar.
The Window Settings dialog box opens. The settings are grouped into several panes of related parameters, which are listed on the left side of the dialog box. Select each pane and specify the window parameters. Click OK to set the window parameters and close the dialog box. These parameters can be edited for placed windows from the Object Info palette, as described in Window Properties.
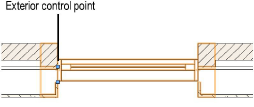
3. Click in the drawing area or in a wall (standard wall or curtain wall) to set the insertion point of the window, and click again to set the rotation. When inserting a window into a wall, place the second click on the exterior side of the wall to establish the exterior direction of the window. The direction of a window inserted in a wall can be changed later by clicking Flip on the Object Info palette.
Several features of the window are described as “interior” or “exterior.” These include trim, shutters, and wall-wrap parts. These elements are determined based on the internal and external faces of the wall, not on the window’s exterior direction. The left side of the wall (as viewed along the wall direction) is always “exterior,” and the right side is “interior” (see Wall Direction). Flipping the window does not flip these elements.
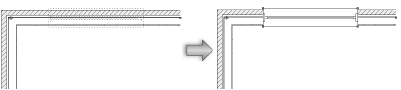
If you are inserting a corner window, place the window in a wall that is attached to another wall. Once parameters are set, the window moves to the nearest corner automatically. This represents one half of the corner window assembly.
Click to show/hide the parameters.
Click to show/hide the parameters.
Click to show/hide the parameters.
3D Visualization options are not enabled for the Opening Sash configuration.
Click to show/hide the parameters.
Click to show/hide the parameters.
Vectorworks Architect or Landmark product required. Corner Window options are not enabled for non-rectangular window shapes or for curtain wall windows.
Click to show/hide the parameters.
Jamb and Sash options are not enabled for the Opening Sash configuration.
Click to show/hide the parameters.
Sill options are not enabled for the Opening Sash configuration or for non-rectangular window shapes, or for curtain wall windows.
Click to show/hide the parameters.
Transom options are not enabled for the Opening Sash configuration or for non-rectangular window shapes, or for curtain wall windows.
Click to show/hide the parameters.
Trim options are not enabled for the Opening Sash configuration or for curtain wall windows.
Click to show/hide the parameters.
Vectorworks Architect or Landmark product required. Lintel options are not enabled for the Opening Sash configuration or for non-rectangular window shapes, or for curtain wall windows.
Click to show/hide the parameters.
Muntin options are not enabled for the Opening Sash configuration or for non-rectangular window shapes.
Click to show/hide the parameters.
Vectorworks Architect or Landmark product required. Interior Shutter options are not enabled for the Opening Sash configuration or for non-rectangular window shapes, or for curtain wall windows.
Click to show/hide the parameters.
Vectorworks Architect or Landmark product required. Exterior Shutter options are not enabled for the Opening Sash configuration or for non-rectangular window shapes, or for curtain wall windows.
Click to show/hide the parameters.
Vectorworks Architect or Landmark product required. Centerline Marker options are not enabled for curtain wall windows.
Click to show/hide the parameters.
Interior Wall Detail options are not enabled for non-rectangular window shapes or for curtain wall windows.
Click to show/hide the parameters.
Exterior Wall Detail options are not enabled for non-rectangular window shapes or for curtain wall windows.
Click to show/hide the parameters.
The visibility of the overall 3D window is controlled by the Class setting on the Object Info palette; part settings are controlled from the Window Settings dialog box.
Click to show/hide the parameters.
Certain data fields represent calculated values and cannot be edited; as a result, the Field Name and Field Value appear dimmed for those data fields.
Click to show/hide the parameters.
~~~~~~~~~~~~~~~~~~~~~~~~~
![]()