 Creating
Curtain WallsCreating
Curtain Walls
Creating
Curtain WallsCreating
Curtain WallsIn the Vectorworks Architect and Landmark products, the capabilities of the Wall and Round Wall tools are expanded to create curtain walls. Curtain walls consist of frames that contain panels; often, the panels are made of glass, but they can also be opaque or decorative. The Vectorworks program models the frames, panels, and connections according to real-world architectural standards. Since the curtain wall is based on the Wall tool, it can take advantage of all the benefits of the Wall tool, such as resizing, editing, joining, using walls as the basis of slabs and spaces, bounding by story level, inserting plug-in objects, and more. Doors and windows have special capabilities when they are inserted within curtain walls so that all the design elements work together.
Click here for a video tip about this topic (Internet access required).

To create straight curtain walls:

To create round curtain walls:
1. Select the Wall or Round Wall tool from the appropriate tool set:
● Fundamentals workspace: Walls tool set
● Design Series workspaces: Building Shell tool set
2. Click the desired Offset mode (see Creating Walls).
3. To draw with an unstyled wall, select <Unstyled> from the Wall Style list on the Tool bar. If the desired styled wall resource has already been created, select it from the Tool bar list or double-click on the resource in the Resource Browser and proceed to Step 6. Curtain walls have specific wall styles; the default styles begin with the prefix CW for easy identification.
4. Click Preferences from the Tool bar.
The Wall Preferences dialog box opens. This dialog box can be accessed any time afterward to modify default wall settings.
Curtain walls consist of a repeating grid of frames and panels. Specify the number of horizontal and vertical frames that make up one section of the curtain wall, and then specify the appearance of the frames and the panels within that grid. The defined section is repeated over the length and height of the wall.
Curtain walls can be drawn first, and if not using a wall style, the parameters can be set later from the Object Info palette by clicking Curtain Wall Grid. The Curtain Wall Grid dialog box opens, to edit the parameters of the unstyled curtain wall. However, editing unstyled walls by this method may clear existing frames and panels, and recreate the curtain wall grid.
Click to show/hide the parameters.
5. When the curtain wall parameters have been specified, and any changes saved as a wall style resource if desired, click OK. A saved or selected wall style is saved as a resource in the file, and appears in the Resource Browser and in the Wall Style list on the Tool bar.
6. If Polygon mode is selected, click at the starting point of the first curtain wall section.
7. Click to end the first wall section.
To continue creating curtain walls, click at the end of each additional wall section.
8. Double-click to finish the curtain wall if the start point and end point are not at the same location; otherwise, click at the starting location (a SmartCursor cue displays) to finish the wall.
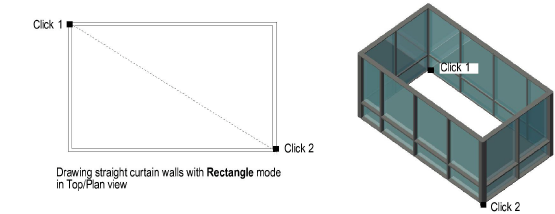
9. Alternatively, if Rectangle mode is selected, click at the wall’s start point; this becomes one corner of the rectangular wall system. Move the mouse to the opposite corner until the desired size is previewed.
10. Click to set a corner point on the wall system. Four walls are created.
~~~~~~~~~~~~~~~~~~~~~~~~~
![]()