 Seating Layout Specifications
 Seating Layout Specifications
The Create Seating Layout command in Vectorworks Architect and Spotlight, as well as the event design suite in the Vectorworks Spotlight product, make use of table and chair symbols that are available from the default content. It’s also possible to make your own table, chair, and nested table and chair symbols for use with these features.
Symbols should be hybrid (2D/3D) so that they display properly in both 2D and 3D views. At a minimum, the symbol must contain a 2D representation.
Create the 2D view of the symbol using as few polygons and lines as possible. If possible, use a single polyline rather than individual line segments. The line weight of the symbol is also a consideration; the symbols need to stand out when printed. The outer perimeter of the symbol should have a line weight of at least 1/2 point (7 mils). Interior details should use a lighter line weight. The 2D representation should have a solid fill so that it obscures information under the symbol.
Keep the 3D symbol simple. It should be solid. The model should be accurately sized, but without minute details. These items can add significantly to the rendering time required, and are not necessary to distinguish among instruments.
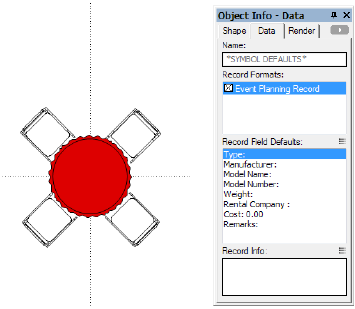
To create a table and chair symbol, create the chair and table symbols separately, and then create a symbol from the table and chair symbols, so that the table and chair symbols are nested symbols.
Attach the Event Planning Record to the symbol, with the Type field indicating whether the symbol is a table or chair. This allows the Seating Count worksheet to accurately count tables and chairs.
To attach the event planning record:
1. In the Resource Browser, import the Event Planning Record from the Seating.vwx default event planning library file.
Locate the Event Planning Record and select Resources > Import to bring the record into the current file.
2. Select the new seating symbol, and select Modify > Edit Symbol.
If attaching the record to nested table and chair symbols, select the table or chair, and select Modify > Edit Symbol again to edit the individual table or chair. After attaching the event planning record to one of the nested symbols, repeat the procedure to attach the record to the other symbol.
3. In the Edit Symbol window, click on a blank area so that nothing is selected.
4. Click the Data tab in the Object Info palette. Attach the Event Planning Record to the symbol defaults by selecting the check box. Then edit the record by selecting the record field and entering its record information. The Type field for tables should contain “Table“ for tables and “Chair” for chairs, for proper object identification and inclusion in worksheets.

5. Click Exit Symbol at the upper right corner of the window to return to the drawing.
~~~~~~~~~~~~~~~~~~~~~~~~~
