
There are several types of snap points. Use these in combination with the settings in the Snapping palette, SmartCursor Settings dialog box, the Interactive Appearance Settings dialog box, and Interactive tab in Vectorworks preferences to tailor snapping and snapping appearance to your drawing task. In addition to the snap points, other interactive elements assist with snapping.
● Available snap points
Available snap points display near the cursor, within the snap box area, to indicate that a snap point is near the cursor.
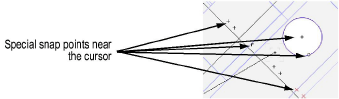
● Special snap points
Special snap points display in the general cursor area, to inform you that midpoint, center, along line, and/or tangent snap points are nearby. The visible snap points depend on the snapping enabled in both the SmartCursor Settings dialog box and the Snapping palette.
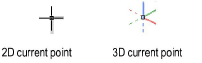
● Current snap point
The current snap point shows that the SmartCursor is snapped.

The current snap point indicator is black in 2D. In 3D, the indicator displays with red, green, and blue colors, which correspond to the red (X), green (Y), and blue (Z) axes. The orientation of the 3D indicator is relative to the current working plane; dashed lines indicate the negative axes.
● Obtained snap point
When drawing with a tool, such as the Line tool, the first click of the tool on a current snap becomes the obtained snap point. The obtained snap point only displays for a brief moment, letting you know that the click was snapped.

● Smart point
When the Smart Point snapping is enabled, up to three smart points can be defined at one time; see Smart Points Snapping. A smart point displays as a red rectangle by default. If extension lines are enabled, the extension line for the smart point appears as a dashed line. A datum is a special type of smart point and counts as one of the three smart points.

● Snap object highlighting
The object from which the snap points are generated is highlighted with a dashed line. This ensures that the correct snap points are being obtained within a congested drawing.

● SmartCursor selection box and snap box
Two areas around the cursor assist with drawing: the selection box and snap box.
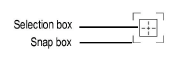
The selection box shows the area where object geometry can be selected or recognized by a tool that selects or clicks objects (such as the Selection tool or the Eyedropper tool). The snap box indicates the area from which the current snap will be obtained. The current snap is obtained from all the available snaps inside the snap box. The snap box allows a snap to be held while the selection box moves around to change the snapping selection.
The size and visibility of the selection box and snap box can be adjusted, and these indicators enabled, from the Interactive tab in Vectorworks preferences.
● Acquisition hints
Acquisition hints display the potential snap points that can be acquired near the cursor. They indicate that a smart point, smart edge, or vector lock can be acquired.
Acquisition Hint |
Appearance |
|
Smart point |
|
|
Smart edge |
|
|
Vector lock |
|
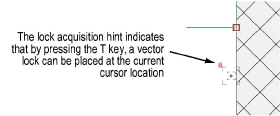
Enable the acquisition hints from the Interactive tab in Vectorworks preferences.
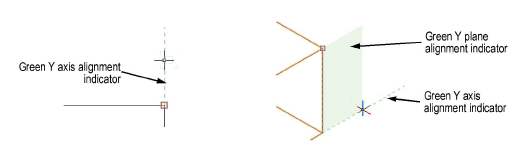
● Alignment Indicators
Lightly colored axis and plane indicators provide subtle hints to help determine whether the cursor is aligned to an axis (2D) or an axis and/or plane (3D). The color of the indicator matches the axis color (red for X, green for Y, and blue for Z) to help you determine when the cursor is aligned to an axis or plane.
~~~~~~~~~~~~~~~~~~~~~~~~~
![]()


